
everyone welcome back to the scraps and
doily store in SoHo
it is mesally and me dane woohoo
we are back together because we are
going to show you one of our top picks
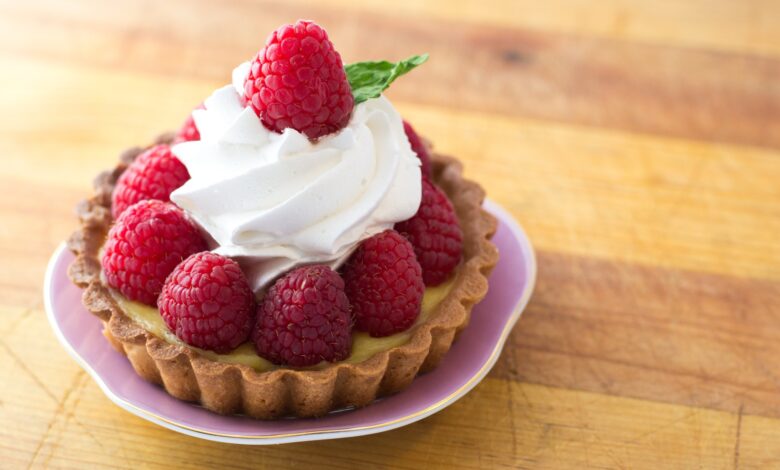
cakes it’s ideally suited for summer it is the
raspberry white chocolate cake
it is scraps and doilies exemplary it is
so magnificent
so we have four layers of raspberry
swell wipe which I know a ton of you
have been requesting a raspberry pi
wipe, however, we will give you
our privileged insights
at present and afterward, we’ve got
some truly
smooth smooth white chocolate
buttercream
we will beautify it so
wonderfully we will do a white
chocolate trickle
just as heaps of meringues and
chocolate truffle enrichments so we have
got
burdens to continue ahead with I don’t think
you will move beyond this piece of the
video without buying in since in such a case that
you’ve not preferred the channel
that implies you’re not a piece of the
cupcake gemma family so get to it
since the button is not too far off
indeed and there’s a little ringer close to it
you need to click that also because
then, at that point, you’ll get a warning
each time we transfer a video and if you
like this video then, at that point, kindly give us a
approval
since the more likes, we get we know
what sort of recordings do you folks need to see
so yes I will break on with this
raspberry wipe
today and I’ll have returned to show you the
white chocolate buttercream so hightail it
okay folks so this is super
basic we will utilize the
customary
creaming technique for this and we’re going
to begin with, creaming together
625 grams of both truly delicate
unsalted margarine and caster sugar so I’m
utilizing my stand blender with the oar
connection
furthermore, we will begin by blending this
on a medium to high velocity
for around five minutes yet what you need
to do is simply check out it
also, delay until it gets truly pale in
shading and it’ll be somewhat feathery
so you can understand pale and
cushioned it looks nearly
white frankly and the sugar began
to break down which is great and at this
the stage we are making burdens and heaps of
air so don’t abandon this you just
need to keep it whipping since this is
how we get a pleasant
light breezy wipe so next up we’re going
to add 10
eggs since this is a major cake so I’m
going to break two all at once
I will add them to my blend and afterward
I will beat them all-around well in
between every expansion
since we want to continue to add air
[Music]
so at this stage in some cases your combination
can look somewhat split a tad
like a fried egg, however, don’t stress as
before long as we begin adding flour it’s going
to all return together
so discussing flour we have 625 grams
of self-raising flour
that I’m going to include two
cruel because there’s a considerable amount and I
try not to need to implode the entirety of this air
so I’ve as of now filtered this and we’re
going to add
half in and I will put my blender
onto the very slowest setting since we
without a doubt need to overlap this though we don’t
need to take out any of that hair
furthermore, while the blender is as yet running on
the lethargic speed I will add four
tablespoons of entire milk into the blender
also, when it’s consolidated we’re going
to stop it and polish it off manually
we need to ensure that
everything from the base and the sides
it’s completely consolidated and this is looking
stunning so sleek so presently the time has come
to wave and place into our tins so I’ve
got four nine
inch cake tins here because we’re going to
make this an eight-inch we will manage
off the
caramelization from the outside so the
The first thing I will do is put a few
tin splash in which you can get this from
cupcakegemma.com
what’s more, it is likely the most efficient
thing
that you can purchase since we used to
do every one of our tins with spread and flour
what’s more, it took
an age so whenever you’ve showered those
what we will do is snatch our
raspberry goo now for this cake you’re
going to require a great deal
of raspberry goo and on the off chance that you haven’t seen
step by step instructions to make it I’ll put an appropriate full on
video in the portrayal box underneath
be that as it may, basically you simply need to whack
a few raspberries and a smidgen of
sugar
in a pot over high hotness and get
it gurgling and reducing endlessly
and afterward, you need to drop it down to a
stew and whenever you’ve had it on for
around 10 to 15 minutes you need to take
it off
strain it and whenever it’s chilled off
you have this the most unimaginable
normally perfectly pink raspberry
sauce so we want to swell this through
our wipe and I like to do it a little
bit by tad so we don’t end
up with like a dinky dark sort of
combination
so I will place in around a few
tablespoons I’m simply going to squirm it
over the highest point of my spread
I will get my spatula I will do a
few swirly spins
furthermore, that is it and afterward going to stack up
one of my tins since along these lines
you will get these like enormous
pools of tasty
the raspberry sauce which will go all
tacky whenever it’s heated
and afterward, we’ll snatch our offset range
blade and we’ll spread it out
then, at that point, you need to continue to do this
adding a tad of raspberry Gucci
hitter
whirling it through and afterward topping off
all of your cake tins
[Music]
what’s more, I realize it doesn’t appear as though they’re
exceptionally undulated right currently yet that is as it were
since we smooth out the top piece
truly when we trim it later you will
see those beautiful raspberry swells
so presently they are prepared to heat so we’ve
got the broiler preheated to 170 degrees c
what’s more, we’re going to pop these in for
somewhere close to 20 to 25 minutes
contingent upon your broiler so I’d generally
look at them after 20.
you need to place a stick in the center
of every single tin
since they may be a smidgen
lopsided when they come out clean they’re
done assuming they’re somewhat gooey then, at that point,
leave them in for one more moment or thereabouts
so I will do that tidy up and
then, at that point, dane will have returned to show you the
white chocolate buttercream
how about we get to make the white chocolate
icing so I have 320 grams of cooled
liquefied white chocolate here
what’s more, to my blender I will add a few
truly
the delicate spread I have 500 grams here
unsalted
going straight in and we will get
that whipping on a rapid until it’s
quite pale
what’s more, fleecy and all prepared and sodden
right this is much paler than when we
begun you can see
here it’s overall quite white and prepared
furthermore, that is because it has a ton of air
in it and that is the thing that will make
our icing
quite smooth and satiny so next we’re
going to add some icing sugar
here I have 750 grams I’m simply going
to add it a tad by a smidgen
since it will go like cloud dust if
[Music]
not
all of our icing sugar has been added so
you see I added it in two parts
blending it on a lethargic speed, to begin with
and afterward turning it up to a high velocity
in any case, first, before we add the white
chocolate I’m simply going to take a
smidgen out
for the enrichment at the lower part of the
the cake will be a raspberry
band of icing so I’ve recently got
simply a small sum in a bowl and some of
the raspberry goo that sally had before
I’m simply going to place somewhat spoonful in
there
furthermore, we’ll give it a little blend around
just to make a decent
pinkish raspberry icing
decent so that is completely done and afterward next
I will add all of my
white chocolate to the icing
[Music]
this has been whipping for several
minutes now for the last stage we’re
going to add some entirety
milk now this will rely upon how warm it
is the place where you are
be that as it may, you simply need to add a tad at
a period you’re searching for a truly
smooth spreadable consistency
not very messy and not very firm
the milk and the white chocolate has
been added and the icing is prepared so
I’ll show you what it resembles
it’s truly smooth and prepared and
it’s holding its shape it’s not falling
off the spatula since we need to be
ready to ice the cake with this we don’t
need to
put it in the layers of the cake and
have it slide and slosh around
this is wonderful you can store your
buttercream at room temperature
for around a few days in a
Tupperware holder
what’s more, I’m simply going to leave mine like
this since we will utilize it right
presently
the cakes are almost done we’ll take
they out pass on them to cool and afterward
we’ll get managing and filling
[Music]
OK the cakes are out they have cooled
down the time has come to manage
fill and scrap coat this lovely cake
so
we planned to do this as a four-layer
the cake however we’ve in reality chosen to
do it as an eight-layer cake because
eight is superior to four so I’m going to
show you how we will part
a wipe in half so as a matter of first importance we’re
going to manage off the top like we ordinarily
do
utilizing the leveler currently, I have mine set
to six
um yet I prefer to see what’s going to
take minimal sum off the top
so we will do that first
I’m simply going to place all the offcuts in
this bowl because recollect
you can make truly incredible cake truffles
balls pop better believe it anything you desire to
call them we’ll put a connection to a truly
fun video that
me dana and Nicki preferred a couple of months
back you can make truly cool fun
things with these now the thing I’m going to
do is bring my leveler down to the most reduced
setting
like so and I will do the specific
the same thing again and you’ll see
whenever we have done this
that now we got two layers not one
good so I’m finally going to
trim off the actual edges of this cake
since we prepared a nine
inch and I need to bring it down to an
eight inches since we like to dispose of
all the caramelization um obviously
you don’t need to do this stage
by any means and that is it there are our
first
two layers of raspberry wipe which I
am presently going to ignore today thus
I will continue to do this
also, he’s going to I will do the
layer them up
so I have my um little wrenched offset
spatula
what’s more, it will get somewhat the
white chocolate icing that we
we just prepared all of a sudden and
I will put the main layer of
cakes
slap on to the board you can do this on
a cake board you can do it on a plate
we have a decent marble um
board here so it’s overall quite firm
what’s more, we will substitute the layers of
this so we will substitute with
raspberry go